Kit Components
- Capture Antibody Coated Plate* (1 plate)
- α-Synuclein Standard (1-25µg vial)
- 5X Wash Buffer (250mL)
- 2X Reagent Diluent (32mL)
- Biotinylated Primary Antibody (25µL)
- Streptavidin-HRP (25µL)
- Chemiluminescent Substrate A (6mL)
- Chemiluminescent Substrate B (6mL)
- Plate Sealer (3)
* The strips in this plate are not readily removable; it is intended to be used as a whole plate. Attempting to remove the strips will result in damage for which BioLegend is not responsible.
Storage: Store kit at 2-8° C. We suggest storing the α-Synuclein Standard component only at ≤-70° C if you do not intend to use the kit within 2 weeks of receipt.
Human α-Synuclein ELISA Protocol
Notes: Allow kit components to be brought to room temperature before use.
I. Preparation of 1X Wash Buffer
- Label a 1L bottle as “1X Wash Buffer”.
- Dilute 5X Wash Buffer 1:5 using lab grade water* and mix well.
*Note: Lab grade filtered water such as injection grade, cell culture grade, Reverse Osmosis De-Ionization (RODI).
II. Preparation of 1X Reagent Diluent
- Label an appropriate sized bottle as “1X Reagent Diluent”.
- Dilute 2X Reagent Diluent to 1X by adding 30mL of 2X Reagent Diluent to 30mL of lab grade water in the bottle labeled “1X Reagent Diluent”.
- Mix well by vortex.
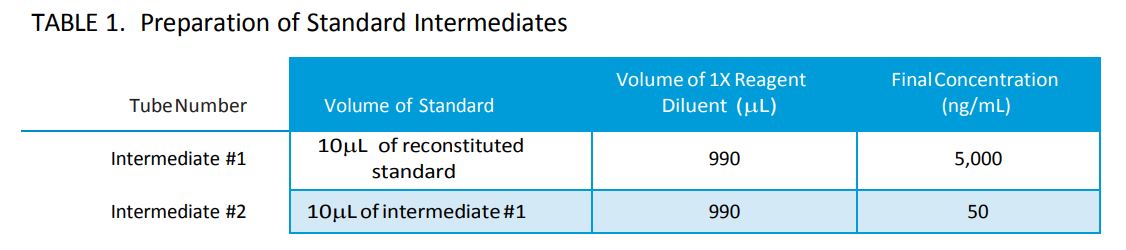
III. Preparation of Standard Intermediates (Refer to Table 1)
- Reconstitute lyophilized standard with 50µL of lab grade water and mix well by vortex. The concentration after reconstitution will be 500µg/mL.
- Label (2) 1.5mL microcentrifuge tubes as intermediate #1 & intermediate #2.
- Aliquot 990µL of 1X Reagent Diluent into intermediate #1 & intermediate #2 tubes.
- Remove 10µL from the vial of reconstituted standard and add to 990µL of 1X Reagent Diluent in intermediate tube #1. Mix well by vortex.
- Remove 10µL from intermediate #1 and add to 990µL of 1X Reagent Diluent in intermediate #2 tube. Mix well by vortex.
- The final concentration of intermediate tube #2 will be 50ng/mL.
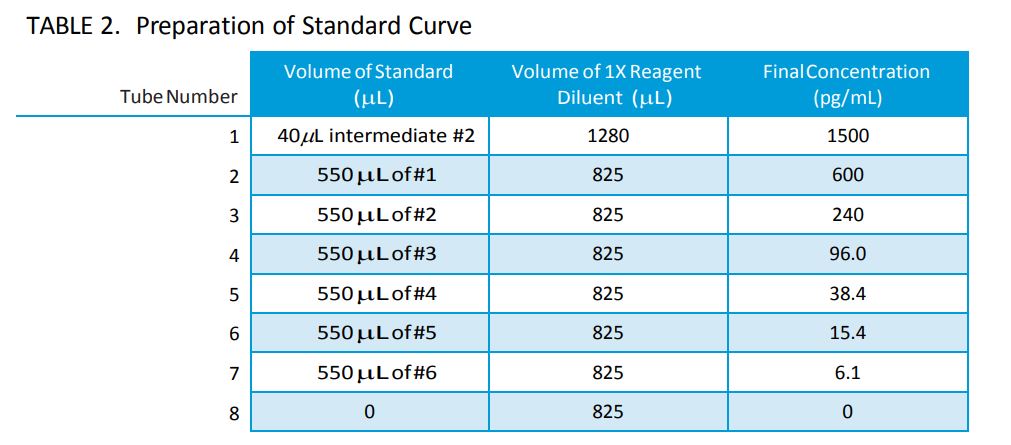
IV. Preparation of Standard Curve (Refer to Table 2)
- Label (8) 1.5mL microcentrifuge tubes as #1-8.
- Add 1280µL of 1X Reagent Diluent to tube #1 and 825µL of 1X Reagent Diluent to tubes #2-8.
- Remove 40µL from intermediate #2 and add to 1280µL of 1X Reagent Diluent in tube #1.
- Mix well by vortex (this will be the top point of the standard curve, 1500pg/mL).
- Remove 550µL from tube #1 and add to 825µL of 1X Reagent Diluent in tube #2.
- Mix well by vortex.
- Continue making 2.5 fold serial dilutions by adding 550µL ofthe previous dilution to 825µL of 1X Reagent Diluent in tubes #3-7. Mix well by vortex between each dilution.
Note: Tube #8 will be the zero or blank sample and should only contain 1X Reagent Diluent
V. Sample Preparation
- Dilute samples in 1X Reagent Diluent. Mix each dilution by vortexing 3X2 seconds.
- Run samples in duplicate or triplicate.
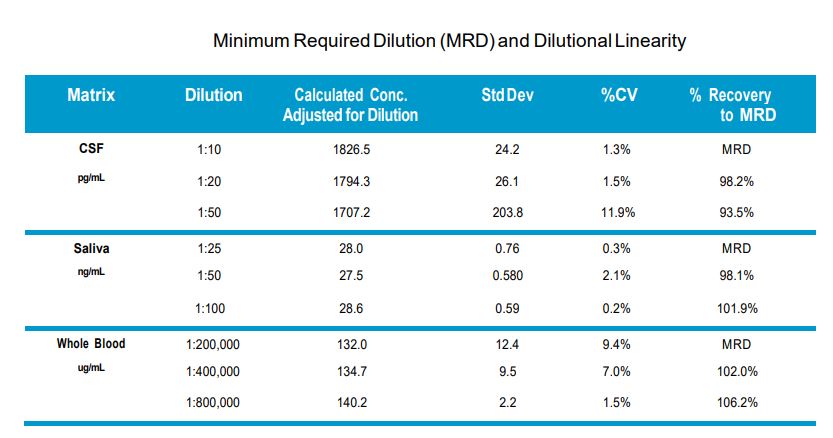
Note: It is good practice to run at least 2 dilutions for each sample to ensure one of the dilutions falls within the linear range of the standard curve. We recommend a minimum dilution of 1:10.
Note: Dilution factors will vary based on the sample matrix of your experiments. We recommend running a subset of your samples in the kit to determine optimal dilutions and evaluate any matrix effects. Failure to do this type of optimization could result in inconclusive data, for which BioLegend is not responsible.
VI. Running the Assay - Day 1
- Remove the plate from the foil pouch.
- Add 300µL/well of 1X Wash Buffer.
- Dump out wash buffer and pat dry.
- Repeat 3 more times for a total of 4 washes.
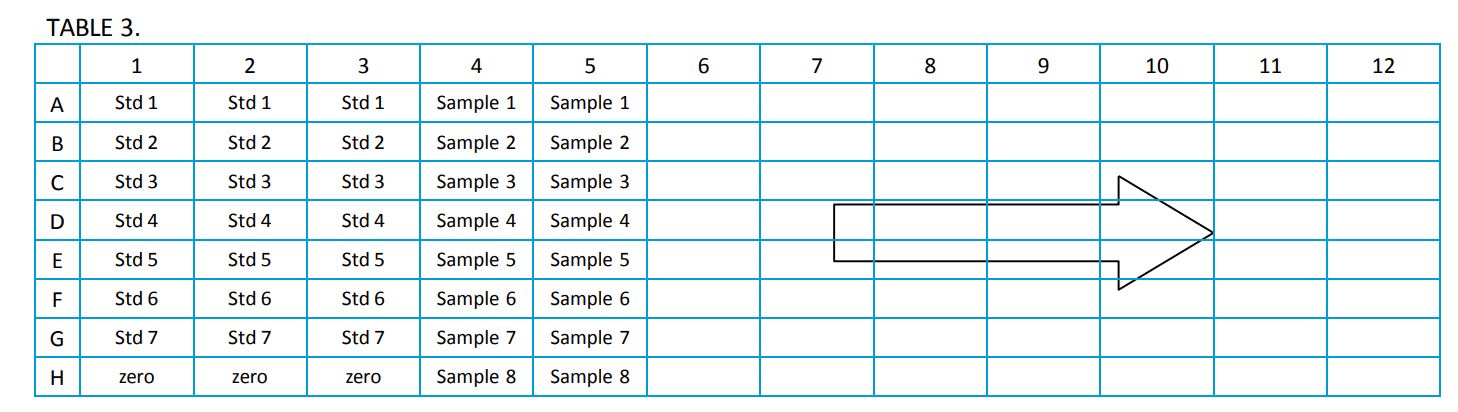
- Add 200µL of each standard to the plate in duplicate or triplicate. Follow the plate layout below.
Note: The volumes in Table 2 are sufficient for running the standard curve in triplicate.
- Add 200µL of each sample dilution to the plate.
- Cover the plate with the plate sealer provided.
- Incubate overnight at 2-8° C, while shaking.
VII. Running the Assay - Day 2
Notes: Allow kit components to be brought to room temperature before use.
- Preparation of Biotinylated Primary Antibody
- Label a 15mL centrifuge tube as “Biotinylated Primary Antibody”
- Dilute the biotinylated primary antibody by adding 6µL* of the Biotinylated Primary antibody stock to 6mL of 1X Reagent Diluent in the 15mL tube labeled “Biotinylated Primary Antibody”
*Note: A quick spin in a centrifuge is suggested prior to pipetting to ensure liquid is at the bottom of the vessel.
- Mix well by vortex
- Remove plate from refrigerator and dump contents.
- Add 300µL/well of 1X Wash Buffer.
- Dump out wash buffer and pat dry.
- Repeat 3 more times for a total of 4 washes.
- Add 50µL/well of the Biotinylated Primary Antibody to the plate (prepared above).
- Cover and incubate for 2 hours at room temperature.
- Preparation of Streptavidin HRP (Refer to Table 4)
- Label a 1.5mL microcentrifuge tube as “HRP Intermediate”.
- Label a 50mL tube as “Diluted Streptavidin HRP”.
- Make the “HRP Intermediate” by adding 10µL* of Streptavidin-HRP stock to 990µL of 1X Reagent Diluent in the 1.5mL microcentrifuge tube labeled “HRP Intermediate”.
*Note: A quick spin in a centrifuge is suggested prior to pipetting to ensure liquid is at the bottom ofthe vessel.
- Mix well by vortex.
- Remove 150µL from the HRP Intermediate tube and add to 22.35mL of 1X Reagent Diluent in the 50mL tube labeled “Diluted Streptavidin HRP”.
- Mix well by vortex.

- Remove plate from incubation and dump contents.
- Add 300µL/well of 1X Wash Buffer.
- Dump out wash buffer and pat dry
- Repeat 3 more times for a total of 4 washes.
- Add 200µL/well of Diluted Streptavidin HRP to the plate (prepared above).
- Cover and incubate for 1 hour at room temperature.
- Remove plate from incubation and dump contents.
- Add 300µL/well of 1X Wash Buffer.
- Dump out wash buffer and pat dry.
- Repeat 3 more times for a total of 4 washes.
- Mix chemiluminescent substrates for use:
- Add 5.5mL ofsubstrate A to a 15mL centrifuge tube.
- Add 5.5mL of substrate B to the same 15mL centrifuge tube.
- Mix well by vortex.
- Add 100µL of mixed substrate per well.
Note: If reading multiple plates add substrate one plate at a time; do not add substrate to all plates at the same time. Add substrate to each plate immediately before reading.
- Shake plate on either a plate shaker or using the shaking mechanism within the plate reader for 10-15 seconds.
- Read plate immediately.
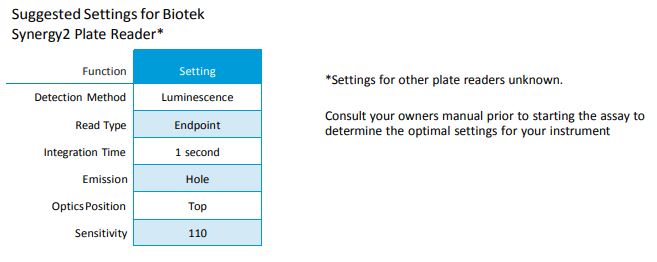
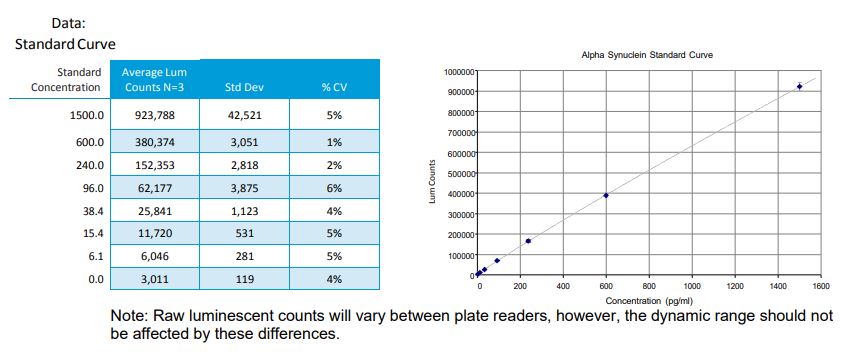
Note: The recommended luminometer settings are to read at a mid-range sensitivity level for 1 second per well. These settings will vary between plate reader manufacturers, please consult your owner’s manual prior to performing this assay.
Frequently Asked Questions
- The protocol says to shake the plate overnight at 2-8°C. What if my lab doesn’t have this capability?
The assay is optimized for the overnight incubation step to shake at 2-8°C . If shaking is not available, results should be acceptable however overall signal may be lower which could impact signal to noise ratio. Please keep this in mind when interpreting data.
- What wavelength do I use to read the plate?
Since this is a chemiluminescent assay, there is no wavelength to read the plates. The plate reader should have a hole setting in the cartridge where the light emitted by the substrate can pass through and be detected. Wavelength settings are for colorimetric assays only.
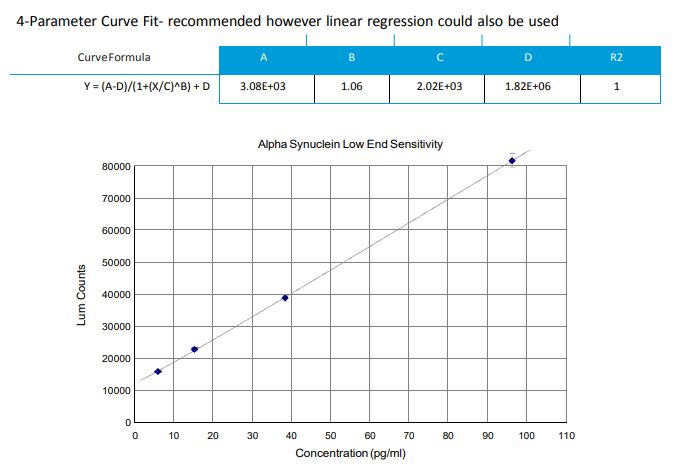
- I am getting very high background and my standard curve is not linear at the low end. What is causing this?
This is typically a washing issue. Inadequate washing will lead to high background and poor sensitivity at the low end of the curve. To fix the issue, either use a plate washer or squirt bottle for all washing steps. Pipette washing will not be vigorous enough. This should help reduce the background and in turn give better sensitivity at the low end.
- I have a plateau at the top end of my standard curve, what could be causing this?
Typically this is caused by not preparing your standard curve from intermediate #2 and using the reconstituted standard instead. The concentration is too high to be detected by the reader and will cause a plateau of the first few points on the standard curve.
- My samples are undetectable in the assay, what is causing this?
The dilution factor you chose might have been too high. Try running your samples more concentrated to see if they are detectable. If you run them undiluted and they are still undetectable, the level of alphα-Synuclein in your samples is too low to be detected by this kit and you may need to concentrate them prior to testing them.
- What are the recommended dilutions for my samples?
This is going to vary based on your specific samples. We recommend running 2-3 different dilutions for each sample, starting with a minimum of 1:10 dilution. This should help ensure one of the dilutions will fall within the range of the standard curve. If you are testing a large number of samples, consider doing a trial run with a subset of samples to optimize the dilution factors and determine if any matrix effects exist. This is a critical step when running a large number of samples and failure to take the necessary optimization steps can result in inconclusive data.
- What types of samples will work with this assay?
Currently, this assay has been tested with CSF, plasma, saliva, whole blood and cell lysates.
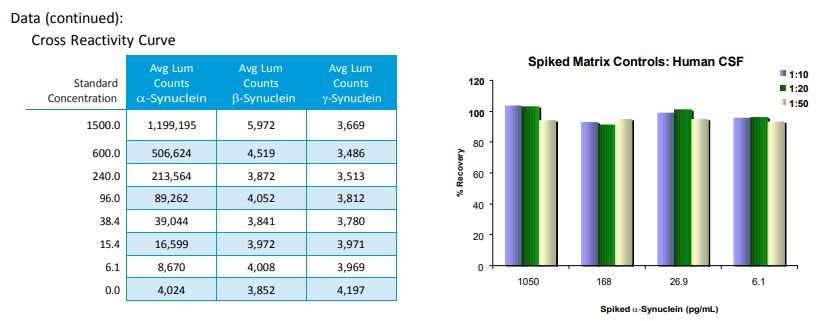
- Does this kit detect gamma or beta synuclein and is it cross reactive with other species?
This kit is specific for human alpha synuclein. It does not detect beta or gamma synuclein and does not cross react with rodent.
- What if I have further questions?
Please call our technical support at 1.877.273.3103 or send e-mail to tech@biolegend.com. We will be more than happy to answer any questions you may have